Pressure Washing Natural Stone
A Pro’s Guide to Avoiding Costly Damage – By Frederick M Hueston
As stone restoration pros, we know pressure washing can be a blessing—or a curse—depending on how it’s handled. Sure, it’s fast, effective, and satisfying to blast away years of dirt and grime. But when it comes to natural stone surfaces, a pressure washer in the wrong hands can do more harm than good.
Let’s take a closer look at what you really need to know before firing up the machine.
The Nature of Stone: More Than Meets the Eye
Stone surfaces — patios, walkways, facades, pool decks — aren’t just there to look pretty. They’re investment pieces that depend on both their surface strength and their internal structure to perform long-term.
Popular stones like marble, granite, limestone, sandstone, and slate all have different levels of porosity, hardness, and resistance to abrasion. Understanding these differences is critical before you start hitting them with high-pressure water.
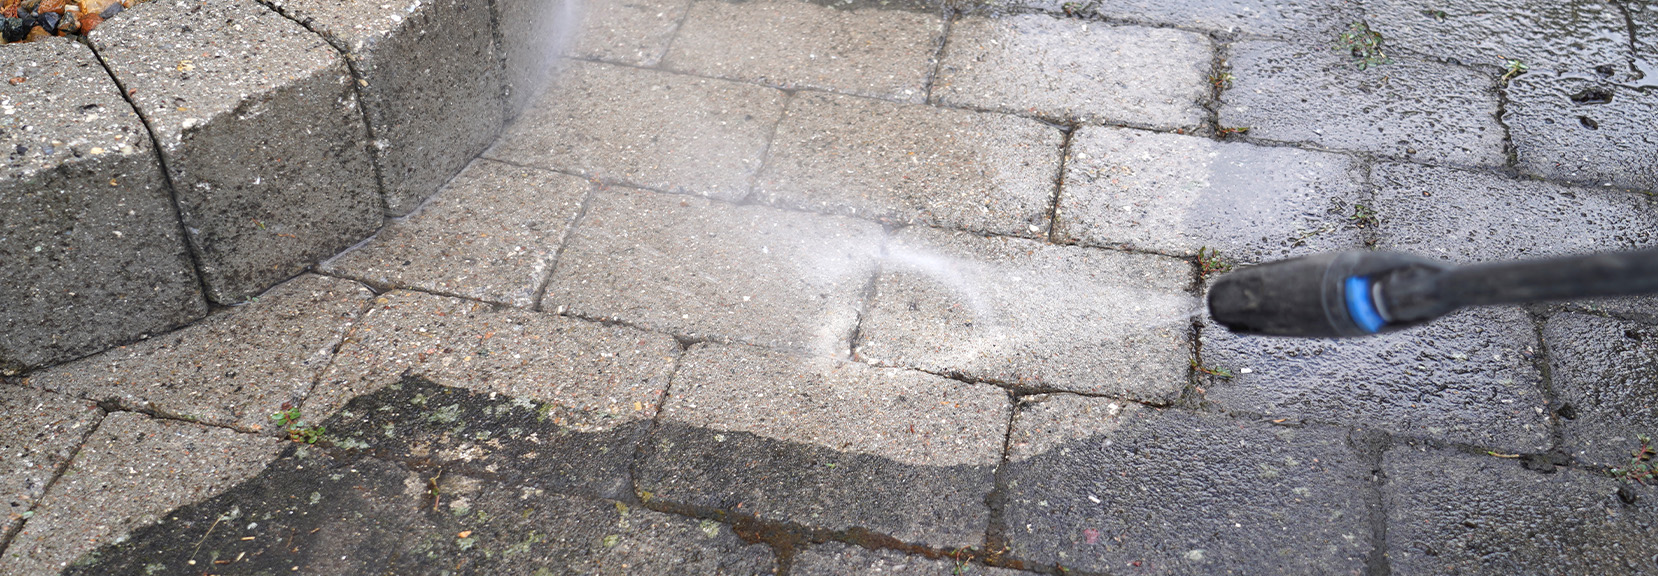
The Risks: What Pressure Washing Can Do to Stone
- Surface Erosion:
Softer stones like sandstone and limestone are especially vulnerable. Hit them with anything above 500–1200 PSI, and you risk blasting away not just dirt, but the stone itself. You’ll leave the surface rough, open the pores even wider, and ultimately speed up deterioration. - Moisture Penetration:
Pressure washing drives water deep into stone pores and hairline cracks. If the moisture gets trapped — especially in cooler climates — you can end up with mold growth, staining, or even freeze-thaw cracking. - Grout and Joint Damage:
Many stone installations rely on grout to hold everything together. Excessive pressure (or the wrong nozzle) can blow out joints, leaving stones loose and the structure compromised. Even medium-density stones like granite and flagstone should be treated carefully, keeping PSI under 1500.
Harder stones like slate might tolerate up to 2000 PSI, but don’t get cocky — edges can still chip if you’re not using the right technique.
Best Practices for Stone Pros
- Start Low and Go Slow: Always start at the lowest pressure setting and only increase if absolutely necessary.
- Use Wide Nozzles: Wider spray patterns distribute the pressure, reducing the risk of gouging or cutting into the surface.
- Understand Your Stone: Know what you’re working with — softer stones demand much lower pressures than harder ones.
- Watch the Angles: Don’t blast directly into joints or cracks. Hit surfaces at a slight angle to avoid forcing water where it shouldn’t go.
- Dry Thoroughly: After washing, make sure the surface dries quickly to prevent moisture-related damage.
Bottom Line
Pressure washing can be an excellent tool in your restoration arsenal — if you know when and how to use it.
Rushing in with high pressure may make surfaces look clean today but cause major headaches tomorrow. As with everything in stone restoration, technique, patience, and the right knowledge make all the difference.